【k8s】02-快速入门
概述
本文旨在利用简单的 web-db 服务,串接 k8s 相关知识
配置
本文采用 kind 搭建测试 k8s 集群
kind 部署 kubernetes 群集相当方便,可以快速部署多个群集。但在群集的配置和更新上有明显弊端,只能通过重新创建群集来配置和更新群集。所以在初始化群集的时候需要考虑好配置选项。当然我们只是用于测试环境,也无大碍
采用 VMware® Workstation 17 Pro 及
CentOS-7-x86_64-Minimal-2009AlmaLinux-9.4-x86_64-minimal (centos7 坑有点多,并且不再维护,所以后续使用 almalinux) 作为基础环境
集群搭建
采用最简单的方式,下载编译后的二进制包,可见 Installing From Release Binaries
1
2
3
[ $(uname -m) = x86_64 ] && curl -Lo ./kind https://kind.sigs.k8s.io/dl/v0.23.0/kind-linux-amd64
chmod +x ./kind
sudo mv ./kind /usr/bin/kind安装 docker
在
/etc/yum.repo.d中新增 docker 源1
sudo curl -o /etc/yum.repo.d/docker-ce.repo https://mirrors.aliyun.com/docker-ce/linux/centos/docker-ce.repo
安装:
sudo yum install docker-ce-24.0.7配置 docker mirror,修改
/etc/docker/daemon.json,加入以下,参考 零门槛最简单国内访问Docker Hub的替代方案1
2
3
4
5
6
7
8{
"registry-mirrors": [
"https://docker.m.daocloud.io",
"https://huecker.io",
"https://dockerhub.timeweb.cloud",
"https://noohub.ru"
]
}生效
1
2sudo systemctl enable docker
sudo systemctl start docker
安装 kubectl,可见 Install and Set Up kubectl on Linux
1
2curl -LO "https://dl.k8s.io/release/$(curl -L -s https://dl.k8s.io/release/stable.txt)/bin/linux/amd64/kubectl"
sudo install -o root -g root -m 0755 kubectl /usr/local/bin/kubectl搭建测试集群:
kind create cluster --config kind-example-config.yaml --name example,如果失败,重试即可(失败可能是虚拟机资源不够)配置
1
2
3
4
5
6
7
8
9
10
11
12
13
14
15
16
17
18
19
20
21
22
23
24
25
26
27
28this config file contains all config fields with comments
NOTE: this is not a particularly useful config file
kind: Cluster
apiVersion: kind.x-k8s.io/v1alpha4
patch the generated kubeadm config with some extra settings
kubeadmConfigPatches:
- |
apiVersion: kubelet.config.k8s.io/v1beta1
kind: KubeletConfiguration
evictionHard:
nodefs.available: "0%"
patch it further using a JSON 6902 patch
kubeadmConfigPatchesJSON6902:
- group: kubeadm.k8s.io
version: v1beta2
kind: ClusterConfiguration
patch: |
- op: add
path: /apiServer/certSANs/-
value: my-hostname
1 control plane node and 3 workers
nodes:
the control plane node config
- role: control-plane
the three workers
- role: worker
- role: worker
- role: worker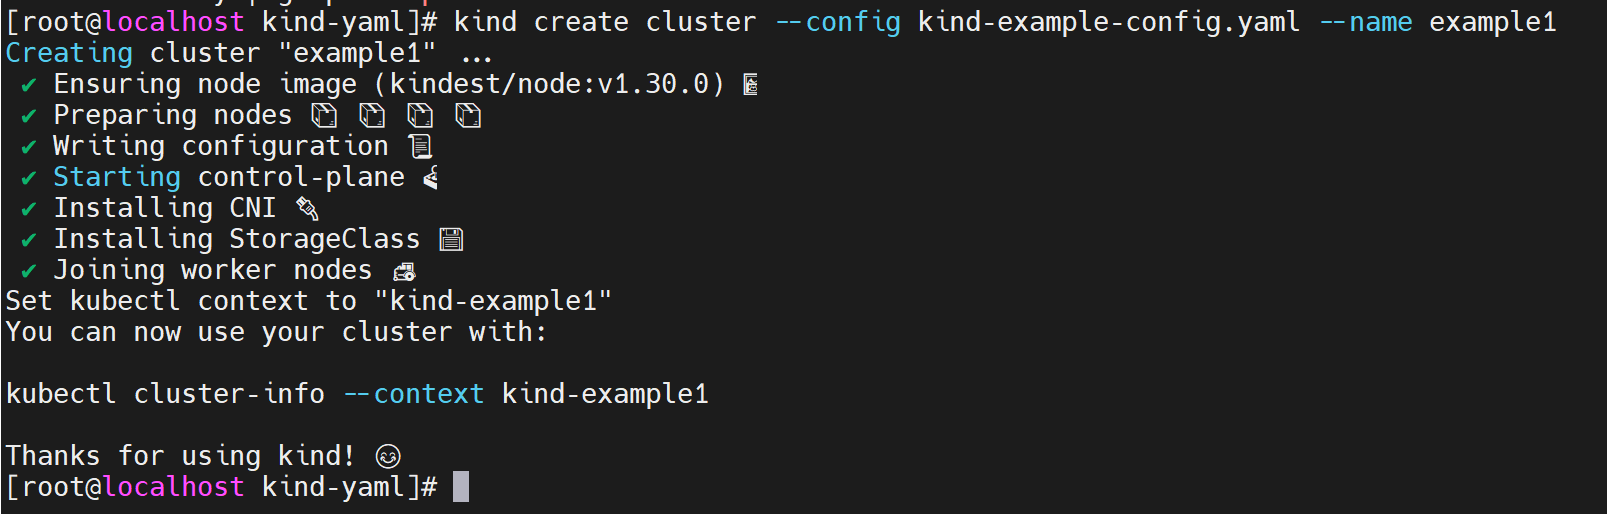
切换为该集群,并查看 node 信息
1
2kubectl cluster-info --context kind-example
kubectl get nodes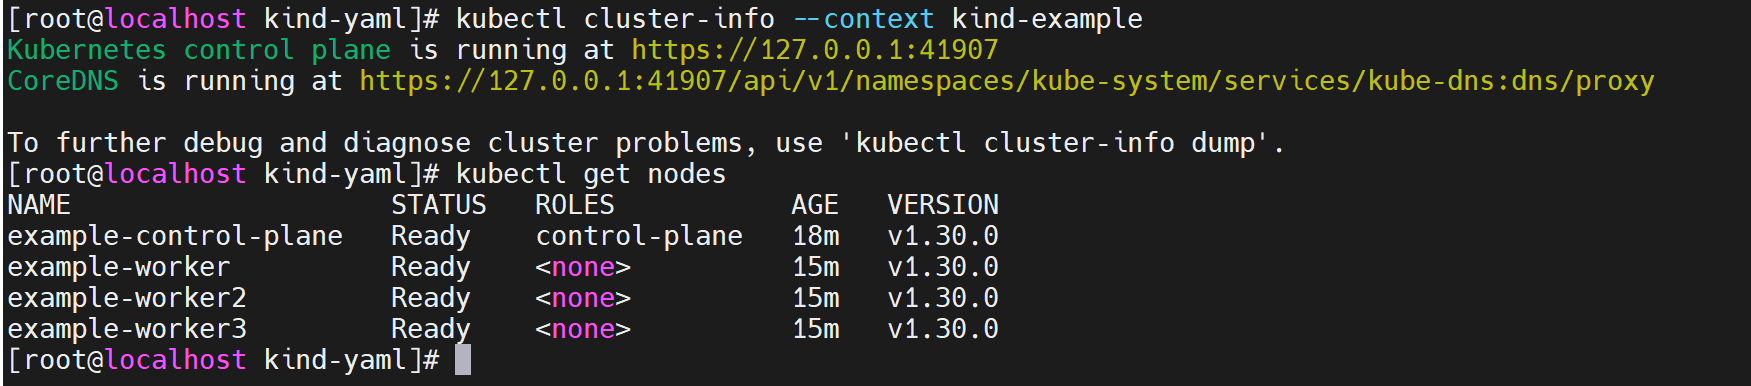
web-db
版本1——Pod
由于本文的目的是搭建一个带有 DB 的 web,因此简易版本需要两个镜像
nginx:latest和mysql:latest由于 kind 不推荐使用 latest 标签(可见 [pod 报错 ErrImagePull 或 ImagePullBackOff](##pod 报错 ErrImagePull 或 ImagePullBackOff)),因此使用以下重命名 tag
1
2docker tag nginx:latest nginx:v1.27.0
docker tag mysql:latest mysql:v9.0.1由于 kind 特性,需要将 image 加载到 cluster 中
1
kind load docker-image nginx:v1.27.0 mysql:v9.0.1 --name example1

可以通过
docker exec -it example-worker crictl images查看某个 node 已加载的 image 信息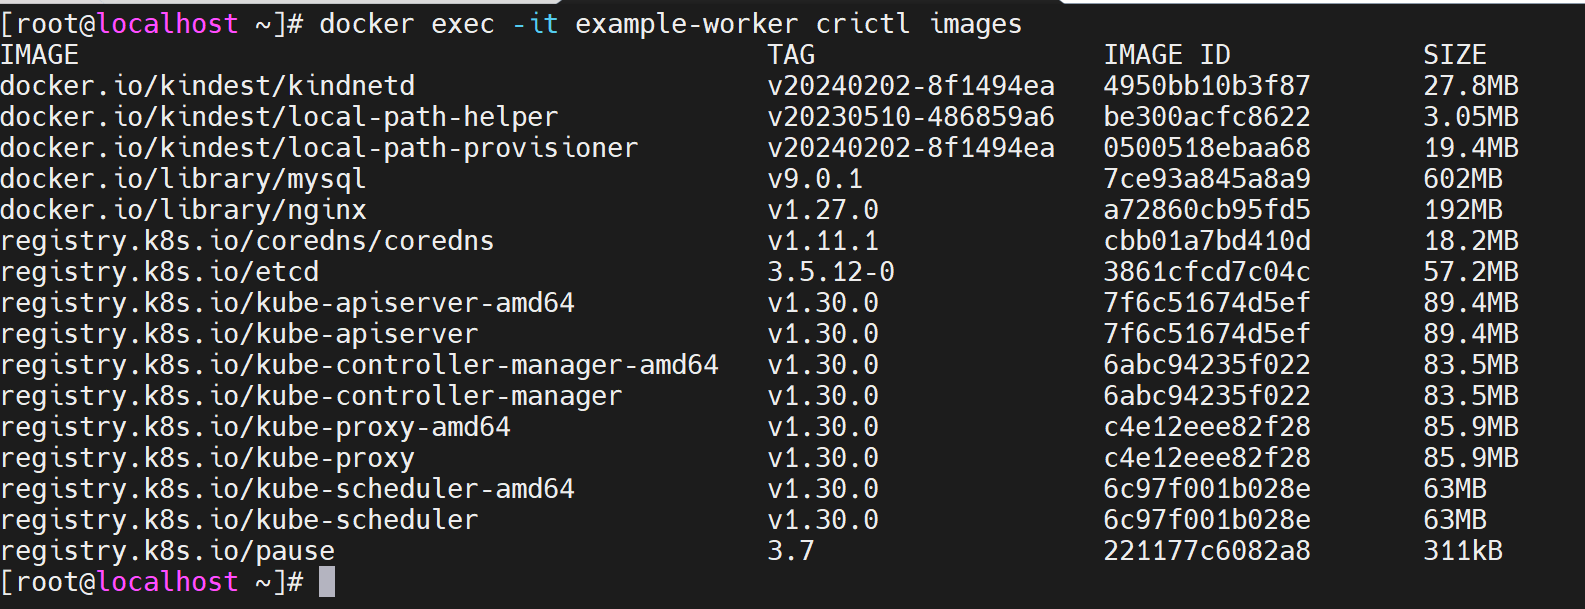
编辑文件
webapp-with-db-pod.yaml并执行:kubectl apply -f webapp-with-db-pod.yaml,即可生成一个 pod,其中含有两个 container1
2
3
4
5
6
7
8
9
10
11
12
13
14apiVersion: v1
kind: Pod
metadata:
name: webapp-with-db
labels:
app: my-webapp
spec:
containers:
- name: webapp
image: nginx:v1.27.0
ports:
- containerPort: 80
- name: database
image: mysql:v9.0.1
通过
kubectl get pods可查看 pod 状态,kubectl get pods -o yaml查看更详细信息。一段时间后,发现 pod 状态异常,通过以下指令一步步定位问题
通过
kubectl get pods -o yaml查看更多的信息,没有发现根本原因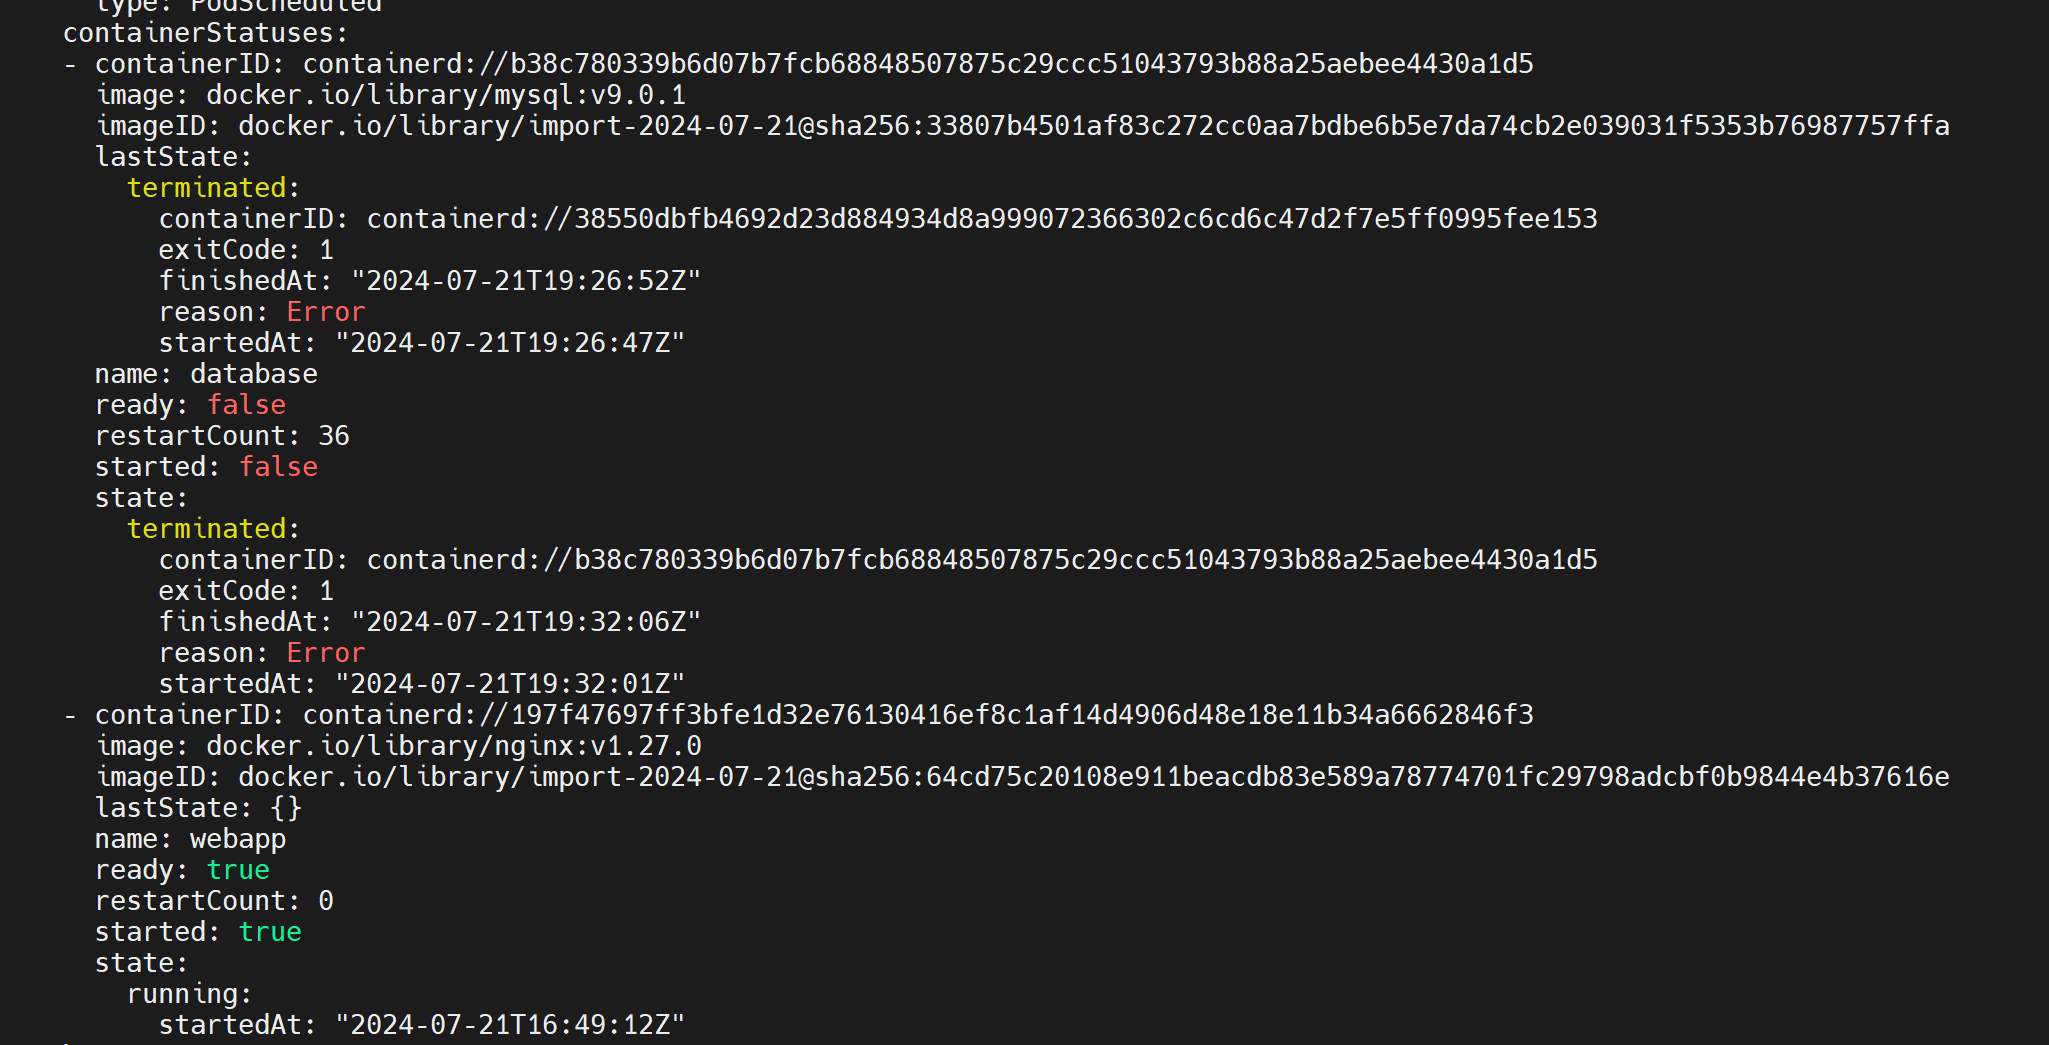
查看 event:
kubectl get events -o yaml,也没有发现更多信息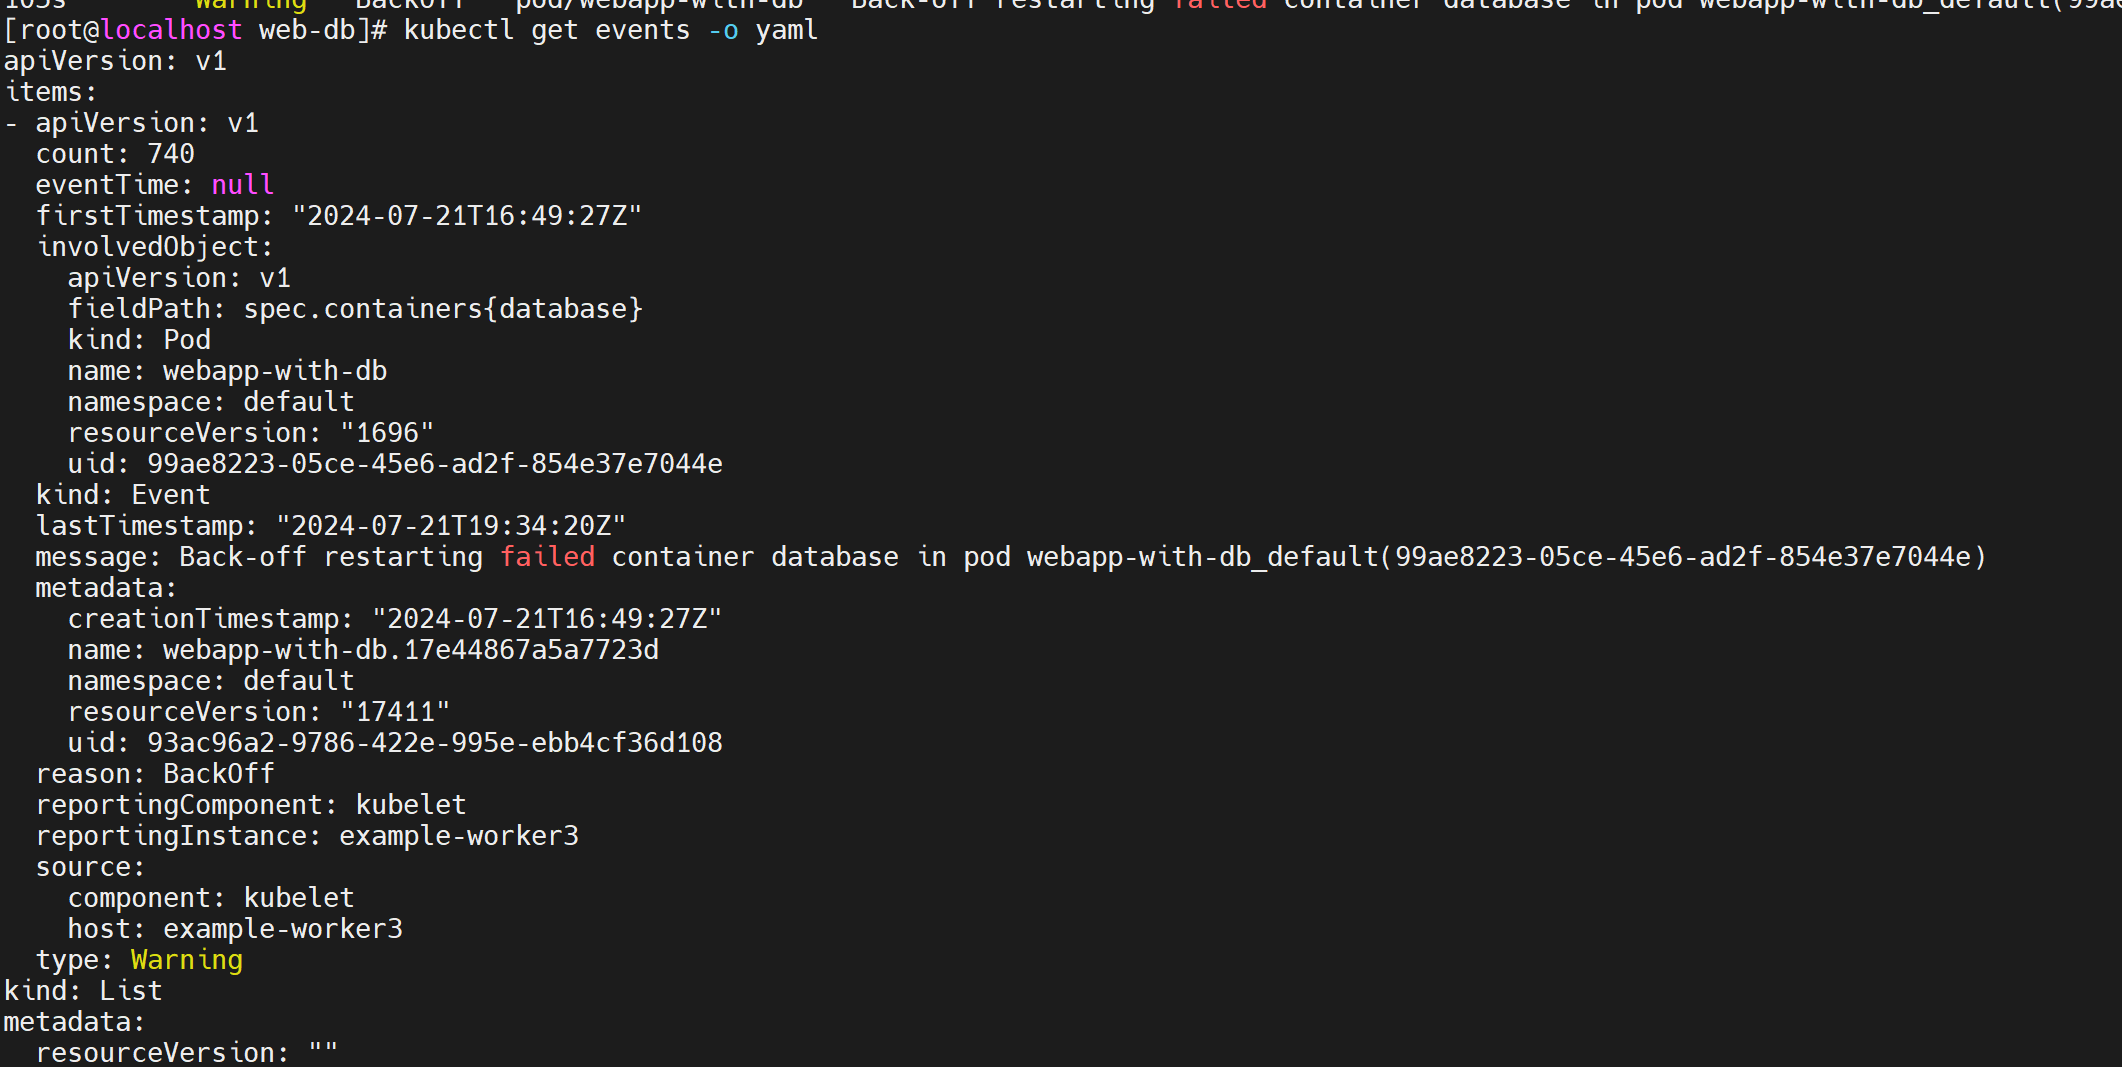
查看 pod 中 database 容器日志:
kubectl logs webapp-with-db -c database。可以发现,MySQL 需要以下环境变量才可以正常启动

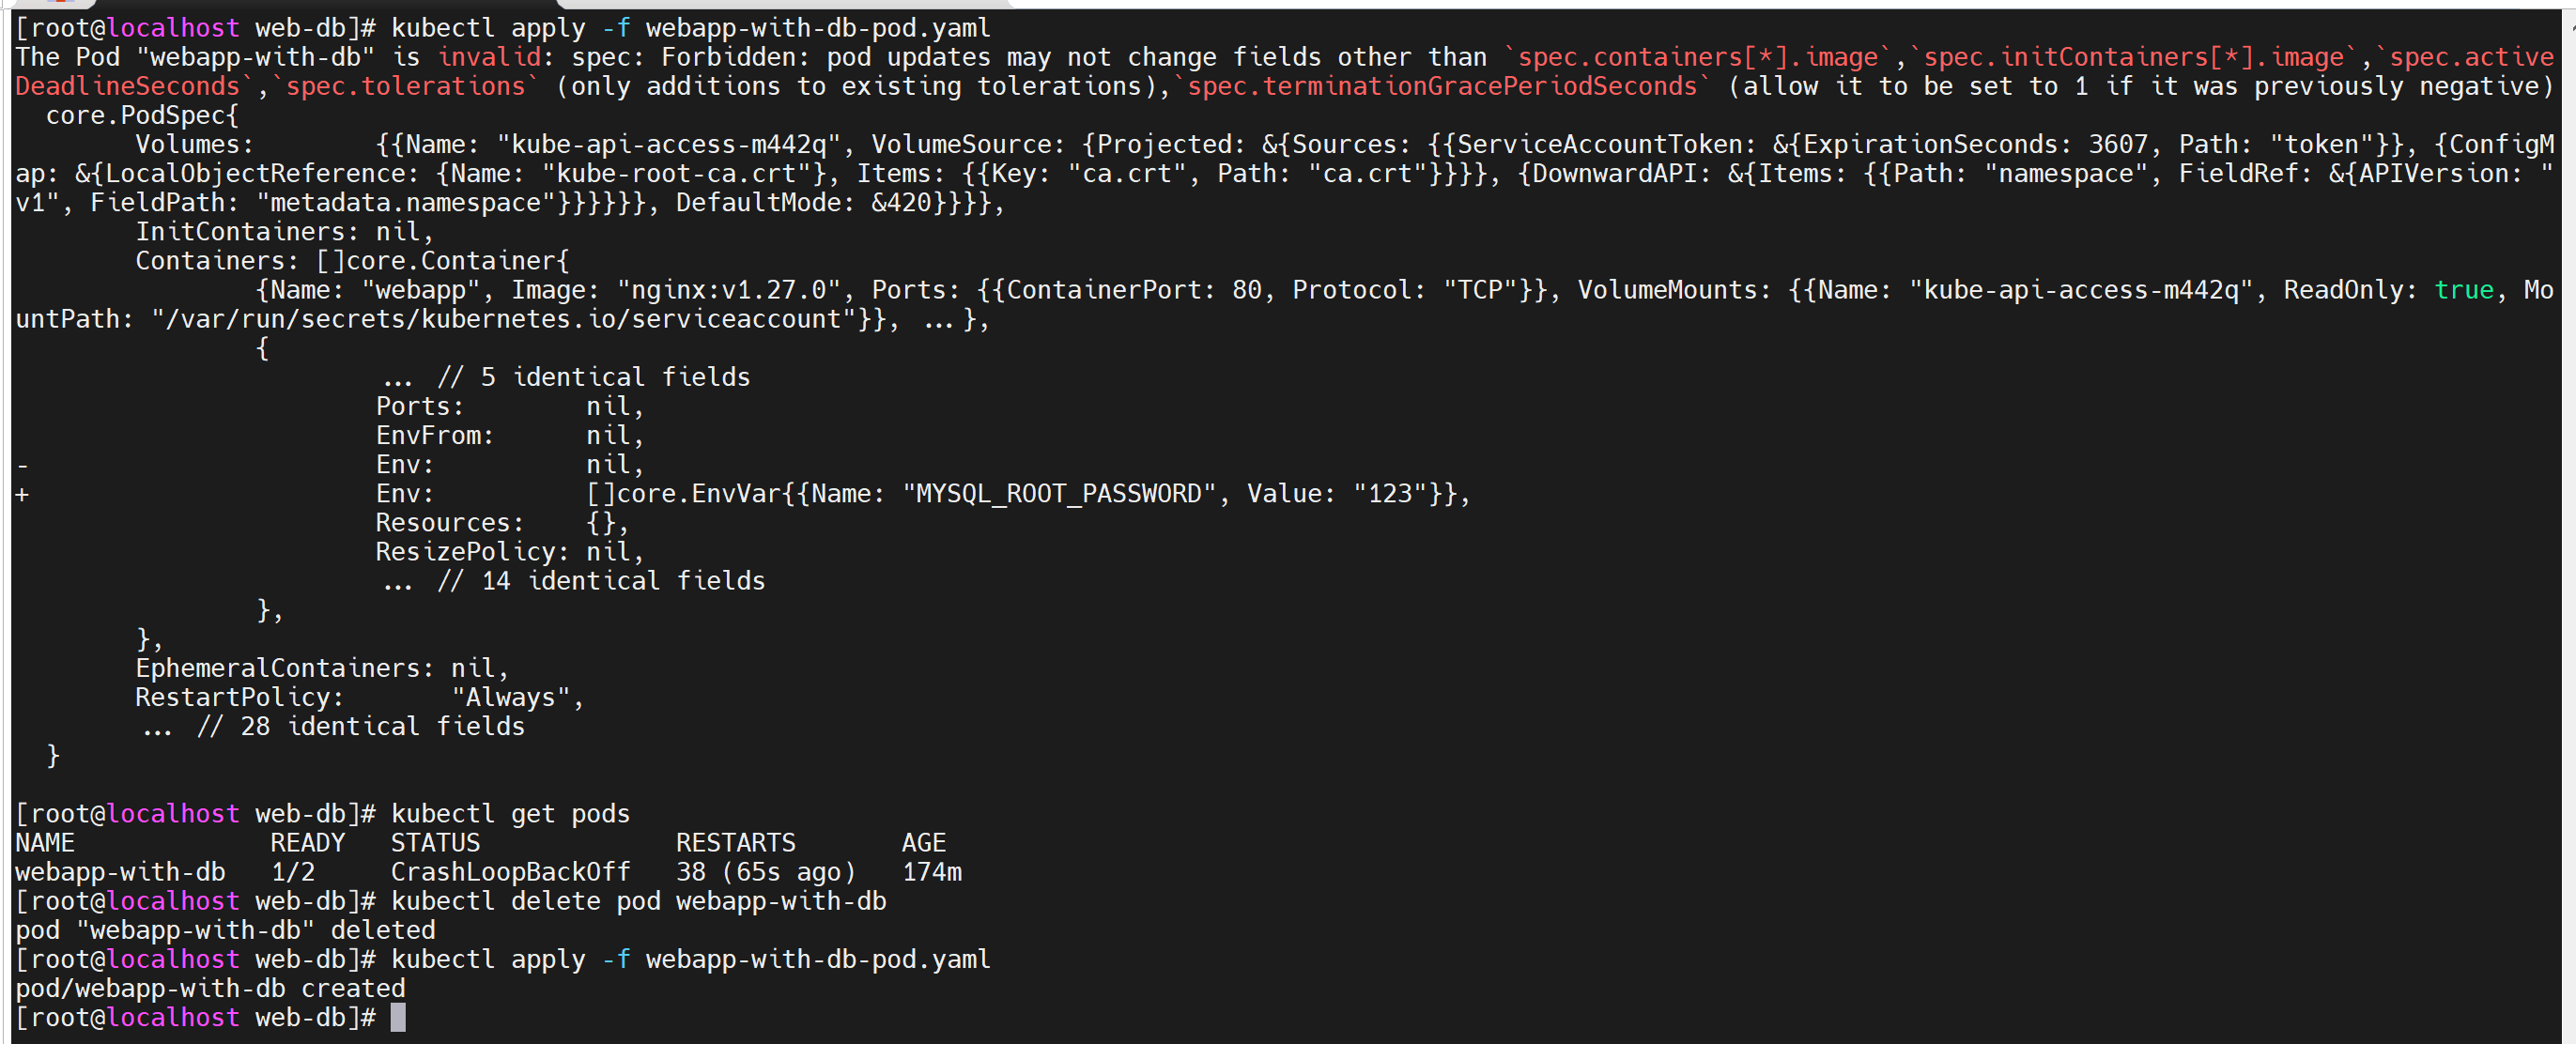
临时解决办法是使用以下 yaml 重新 apply,注意 value 需要使用 string(需删除之前的 pod)。后续版本有更安全的方式
1
2
3
4
5
6
7
8
9
10
11
12
13
14
15
16
17apiVersion: v1
kind: Pod
metadata:
name: webapp-with-db
labels:
app: my-webapp
spec:
containers:
- name: webapp
image: nginx:v1.27.0
ports:
- containerPort: 80
- name: database
image: mysql:v9.0.1
env:
- name: MYSQL_ROOT_PASSWORD
value: "123"如果不删除之前的 pod,报错如下
版本2——Service(集群内服务提供)
版本1已经成功生成了一个 pod,但是外界无法访问该服务,因此引入 k8s 中
service概念,将 Pod 提供的服务暴露给集群内部It allows you to expose your application to other pods within the cluster or to external clients. Services provide load balancing and automatic scaling for the pods behind them, ensuring that the application remains highly available.
更新 yaml 为以下内容,重新执行
kubectl apply -f webapp-with-db-pod.yaml1
2
3
4
5
6
7
8
9
10
11
12
13
14
15
16
17
18
19
20
21
22
23
24
25
26
27
28
29apiVersion: v1
kind: Pod
metadata:
name: webapp-with-db
labels:
app: my-webapp
spec:
containers:
- name: webapp
image: nginx:v1.27.0
ports:
- containerPort: 80
- name: database
image: mysql:v9.0.1
env:
- name: MYSQL_ROOT_PASSWORD
value: "123"
apiVersion: v1
kind: Service
metadata:
name: webapp-service
spec:
selector:
app: my-webapp
ports:
- protocol: TCP
port: 80
targetPort: 80
与上个版本 diff 如下
此时服务只在集群中可被访问,重新起一个 pod 用于测试连通性
1
2
3
4
5
6
7
8
9
10
11
12
13apiVersion: v1
kind: Pod
metadata:
name: db-test
labels:
app: db-test
spec:
containers:
- name: db-test
image: mysql:v9.0.1
env:
- name: MYSQL_ROOT_PASSWORD
value: "123"通过
kubectl get services拿到 webapp-service 的 cluster ip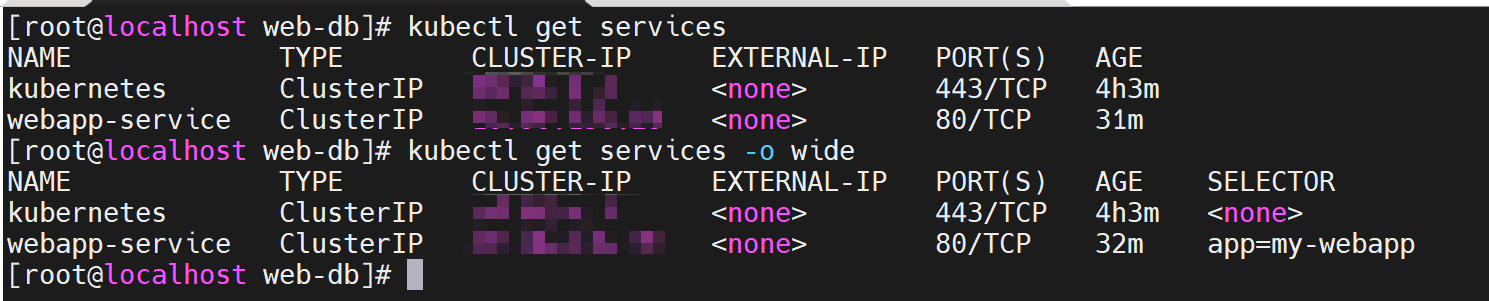
进入新 pod,测试服务连通性
1
2
3
4kubectl get pods
kubectl exec -it db-test -- bash
也可以通过 curl http://webapp-service 测试
curl http://IP:80
版本3——Service(集群外服务提供)
nodeport
版本2 已经提供了一个集群内可供访问的服务,但是集群外无法访问服务,可以通过 nodeport 的方式对外提供服务
更新 yaml 为以下内容,重新执行
kubectl apply -f webapp-with-db-pod.yaml。其中 IP 为 pod 所在 node IP(任意一个即可),可以通过kubectl get nodes -o wide查看 nodeip,即 INTERNAL-IP在 Kubernetes 中,当你使用
NodePort类型的 Service 时,这个 Service 将会在集群中的每个节点上监听一个相同的端口,并将流量转发到对应的 Pod。这就是为什么你可以通过任意一个节点的 IP 地址和指定的 NodePort 访问到服务,即使 Pod 并不在所有节点上。1
2
3
4
5
6
7
8
9
10
11
12
13
14
15
16
17
18
19
20
21
22
23
24
25
26
27
28
29
30apiVersion: v1
kind: Pod
metadata:
name: webapp-with-db
labels:
app: my-webapp
spec:
containers:
- name: webapp
image: nginx:v1.27.0
ports:
- containerPort: 80
- name: database
image: mysql:v9.0.1
env:
- name: MYSQL_ROOT_PASSWORD
value: "123"
apiVersion: v1
kind: Service
metadata:
name: webapp-service
spec:
selector:
app: my-webapp
ports:
- protocol: TCP
port: 80
nodePort: 30001
type: NodePort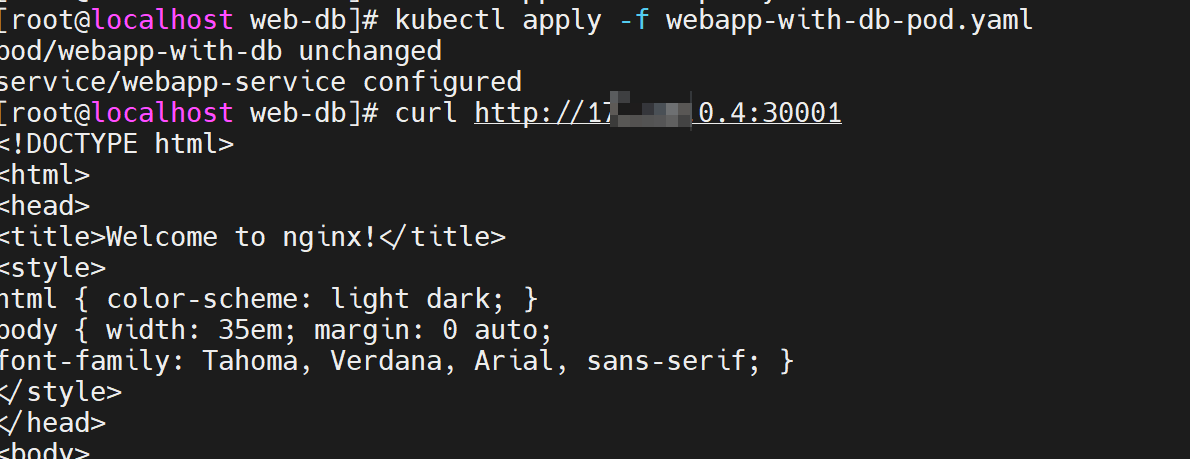
与上个版本 diff 如下
nodeport 和 targetport 区别
- NodePort:
- 用于在集群外暴露 Service
- 在每个节点上打开一个固定的端口,用于接收外部流量
- 外部客户端可以通过节点的 IP 地址和 NodePort 访问 Service
- targetPort:
- 用于定义 Service 转发流量到 Pod 的哪个端口
- 是 Pod 内容器暴露的端口
- 定义了 Service 如何将流量路由到 Pod 内容器
- NodePort:
ingress
ingress 是另一种暴露服务的方式,与 nodeport 区别如下
- Ingress 是一种高级的资源,用于在集群外部暴露服务,支持主机和路径匹配、TLS 终止等功能,需要配合 Ingress Controller 使用。
- NodePort 是一种简单的方式,将服务暴露到所有节点上的一个固定端口,可以通过节点的 IP 地址和指定的端口访问服务,无需额外的 Ingress Controller
具体实现后续再做,可参考
版本4——ConfigMap
版本3 已经成功将 Pod 中的服务提供给外部访问,但是如果需要更新 pod 中配置文件或者环境变量,应该怎么做?
k8s 提供了
ConfigMap的概念,用于存储配置文件信息A Kubernetes
ConfigMapis used to store configuration data that can be consumed by pods as environment variables or mounted as configuration files. It helps separate the configuration from the container image, making it easier to update configurations without rebuilding the container.配置如下
新增了
ConfigMap配置webapp-configwebapp 通过
envFrom引用了webapp-config1
2
3
4
5
6
7
8
9
10
11
12
13
14
15
16
17
18
19
20
21
22
23
24
25
26
27
28
29
30
31
32
33
34
35
36
37
38
39
40apiVersion: v1
kind: Pod
metadata:
name: webapp-with-db
labels:
app: my-webapp
spec:
containers:
- name: webapp
image: nginx:v1.27.0
ports:
- containerPort: 80
envFrom:
- configMapRef:
name: webapp-config
- name: database
image: mysql:v9.0.1
env:
- name: MYSQL_ROOT_PASSWORD
value: "123"
apiVersion: v1
kind: Service
metadata:
name: webapp-service
spec:
selector:
app: my-webapp
ports:
- protocol: TCP
port: 80
nodePort: 30001
type: NodePort
apiVersion: v1
kind: ConfigMap
metadata:
name: webapp-config
data:
WEBAPP_ENV: "production"直接修改后 apply 报错如下 => 解决:删除现有 pod,重新 apply(如果是 deployment 或者 replicaset 只需要删除,k8s 会自动重建)
1
2
3
4
5
6
7
8
9
10
11
12
13
14
15
16
17
18
19
20
21
22
23
24
25
26
27service/webapp-service unchanged
configmap/webapp-config created
The Pod "webapp-with-db" is invalid: spec: Forbidden: pod updates may not change fields other than `spec.containers[*].image`,`spec.initContainers[*].image`,`spec.activeDeadlineSeconds`,`spec.tolerations` (only additions to existing tolerations),`spec.terminationGracePeriodSeconds` (allow it to be set to 1 if it was previously negative)
core.PodSpec{
Volumes: {{Name: "kube-api-access-85btk", VolumeSource: {Projected: &{Sources: {{ServiceAccountToken: &{ExpirationSeconds: 3607, Path: "token"}}, {ConfigMap: &{LocalObjectReference: {Name: "kube-root-ca.crt"}, Items: {{Key: "ca.crt", Path: "ca.crt"}}}}, {DownwardAPI: &{Items: {{Path: "namespace", FieldRef: &{APIVersion: "v1", FieldPath: "metadata.namespace"}}}}}}, DefaultMode: &420}}}},
InitContainers: nil,
Containers: []core.Container{
{
... // 4 identical fields
WorkingDir: "",
Ports: {{ContainerPort: 80, Protocol: "TCP"}},
- EnvFrom: nil,
+ EnvFrom: []core.EnvFromSource{
+ {
+ ConfigMapRef: &core.ConfigMapEnvSource{LocalObjectReference: core.LocalObjectReference{...}},
+ },
+ },
Env: nil,
Resources: {},
... // 15 identical fields
},
{Name: "database", Image: "mysql:v9.0.1", Env: {{Name: "MYSQL_ROOT_PASSWORD", Value: "123"}}, VolumeMounts: {{Name: "kube-api-access-85btk", ReadOnly: true, MountPath: "/var/run/secrets/kubernetes.io/serviceaccount"}}, ...},
},
EphemeralContainers: nil,
RestartPolicy: "Always",
... // 28 identical fields
}- 原因:向已经运行的 Pod 添加 ConfigMap 是不支持的。ConfigMap 是 Kubernetes 中用于存储非敏感数据的对象,用于配置应用程序、存储环境变量等。当一个 Pod 创建时,它会使用 ConfigMap 中的数据或者环境变量,但是一旦 Pod 已经创建并且在运行中,就不能直接修改它的配置或环境变量
- 如果你需要在一个正在运行的 Pod 中更新配置,你有几种选择:
- 重新启动 Pod:
- 最简单的方法是重新启动 Pod。你可以更新 Pod 配置文件,将新的 ConfigMap 引入到 Pod 的配置中,然后删除现有的 Pod,Kubernetes 会自动创建一个新的 Pod,并使用更新后的配置。
- 使用 Sidecar 容器:
- 你可以在需要更新配置的 Pod 中添加一个 Sidecar 容器,这个 Sidecar 容器负责监视 ConfigMap 的变化,并将更新后的配置传递给主要的应用程序容器。
- 使用 Init 容器:
- 另一种方法是使用 Init 容器。你可以在 Pod 中添加一个 Init 容器,这个容器可以在主要应用程序容器启动之前获取最新的配置,并将其传递给主要应用程序容器。
- 使用动态配置:
- 一些应用程序支持动态地重新加载配置,而不需要重新启动。如果你的应用程序支持动态配置加载,你可以更新 ConfigMap,然后通知应用程序重新加载配置。
- 重新启动 Pod:
通过
kubectl exec -it webapp-with-db -c webapp -- bash查看 env 可以发现多了一个环境变量
如果此时修改 WEBAPP_ENV 的值,通过
kubectl describe configmap webapp-config可以发现值已经变量,但是再次进入容器内,可以发现值没有发生变化,是因为 在 Kubernetes 中,Pod 中使用 ConfigMap 设置的环境变量通常需要 Pod 重启才能加载新的值。这是因为当 Pod 启动时,它会获取 ConfigMap 中的值并将其转换为环境变量。如果在运行时更新了 ConfigMap 中的数据,Pod 中的容器并不会自动获取到这些更新后的值,除非 Pod 重新启动如果希望不重启修改能生效,可以采用以下方案
- 使用 Sidecar 容器:添加一个 Sidecar 容器,这个容器可以监视 ConfigMap 的变化并更新主要应用程序容器的环境变量。
- 使用 Init 容器:引入一个 Init 容器,它可以在主要应用程序容器启动之前获取最新的配置,并将其传递给主要应用程序容器。
- 应用程序支持动态更新:有些应用程序支持动态地重新加载配置,可以在配置发生变化时主动更新环境变量,而不需要重启应用程序
版本5——Secret
版本4 已经能够满足配置文件的存储需要了,但是敏感信息直接使用 ConfigMap 安全性不够
k8s 提供了
Secret的概念,用于存储敏感信息Kubernetes
Secretsare used to store sensitive information, such as passwords, API keys, or TLS certificates. Secrets are base64-encoded by default and can be mounted as files or used as environment variables in pods.将 MYSQL_ROOT_PASSWORD 放入 secret,其中 yaml 中填写的值是 base64 处理后的结果,
type: Opaque表示 Secret 中的数据是一个字典,其中包含了任意类型的键值对数据。这意味着在 Opaque Secret 中,可以存储任何类型的数据,例如密码、证书、Token 等,而这些数据以 base64 编码的形式存储在 Secret 对象中1
2
3
4
5
6
7
8
9
10
11
12
13
14
15
16
17
18
19
20
21
22
23
24
25
26
27
28
29
30
31
32
33
34
35
36
37
38
39
40
41
42
43
44
45
46
47
48
49
50
51apiVersion: v1
kind: Pod
metadata:
name: webapp-with-db
labels:
app: my-webapp
spec:
containers:
- name: webapp
image: nginx:v1.27.0
ports:
- containerPort: 80
envFrom:
- configMapRef:
name: webapp-config
- name: database
image: mysql:v9.0.1
env:
- name: MYSQL_ROOT_PASSWORD
valueFrom:
secretKeyRef:
name: db-credentials
key: password
apiVersion: v1
kind: Service
metadata:
name: webapp-service
spec:
selector:
app: my-webapp
ports:
- protocol: TCP
port: 80
nodePort: 30001
type: NodePort
apiVersion: v1
kind: ConfigMap
metadata:
name: webapp-config
data:
WEBAPP_ENV: "production"
apiVersion: v1
kind: Secret
metadata:
name: db-credentials
type: Opaque
data:
password: MTIz
版本6——Volume
以上版本,实现了配置文件和敏感信息的写入,但是对于 DB 数据的持久化还没有实现,并且Pod 中不同容器间也无法共享数据
k8s 提供了
Volume的概念,用于存储数据持久化和数据共享A Kubernetes
Volumeis a directory that is accessible to all containers in a pod. It decouples the storage from the containers, ensuring that data persists even if a container is restarted or rescheduled.以下使用
PersistentVolumeClaim用于请求持久存储资源1
2
3
4
5
6
7
8
9
10
11
12
13
14
15
16
17
18
19
20
21
22
23
24
25
26
27
28
29
30
31
32
33
34
35
36
37
38
39
40
41
42
43
44
45
46
47
48
49
50
51
52
53
54
55
56
57
58
59
60
61
62
63
64
65
66
67
68
69apiVersion: v1
kind: Pod
metadata:
name: webapp-with-db
labels:
app: my-webapp
spec:
containers:
- name: webapp
image: nginx:v1.27.0
ports:
- containerPort: 80
envFrom:
- configMapRef:
name: webapp-config
- name: database
image: mysql:v9.0.1
env:
- name: MYSQL_ROOT_PASSWORD
valueFrom:
secretKeyRef:
name: db-credentials
key: password
volumeMounts:
- name: db-data
mountPath: /var/lib/mysql
volumes:
- name: db-data
persistentVolumeClaim:
claimName: database-pvc
apiVersion: v1
kind: Service
metadata:
name: webapp-service
spec:
selector:
app: my-webapp
ports:
- protocol: TCP
port: 80
nodePort: 30001
type: NodePort
apiVersion: v1
kind: ConfigMap
metadata:
name: webapp-config
data:
WEBAPP_ENV: "production"
apiVersion: v1
kind: Secret
metadata:
name: db-credentials
type: Opaque
data:
password: MTIz
apiVersion: v1
kind: PersistentVolumeClaim
metadata:
name: database-pvc
spec:
accessModes:
- ReadWriteOnce
resources:
requests:
storage: 10Mi可以通过
kubectl get pvc查看 PVC 的状态
可以通过以下方式验证 PVC 的有效性
生成 pod,进入 database,创建数据库和数据表
1
2
3
4
5
6
7
8
9
10
11
12
13
14
15kubectl apply -f webapp-with-db-pod.yaml
create database hello;
use hello;
CREATE TABLE students (
id INT AUTO_INCREMENT PRIMARY KEY,
name VARCHAR(50) NOT NULL,
age INT,
gender ENUM('Male', 'Female', 'Other'),
grade FLOAT
);
INSERT INTO students (name, age, gender, grade) VALUES
('Alice', 20, 'Female', 85.5),
('Bob', 22, 'Male', 78.3),
('Charlie', 21, 'Male', 92.0);销毁 pod:
kubectl delete po webapp-with-db重新生成 pod,进入 database,查看数据是否存在
版本7——deployment
上述版本已经较好的实现了一个服务从启动、对外提供服务、配置信息和敏感信息存储,已经数据持久化工作。但是当 pod 异常退出时,目前没有自愈能力,包括流量变化时,也没有扩缩容能力
k8s 提供了
Deployment的概念,用于无状态应用的生命周期管理A Kubernetes
Deploymentis a higher-level abstraction that manages a set of identical pods. It’s ideal for stateless applications where individual pods are interchangeable. Deployments provide features like rolling updates, rollback, and scaling, making them suitable for web servers, APIs, and microservices.配置如下
- replicas: 3:指定了部署的 Pod 副本数量为 3
- selector: 定义了用于选择哪些 Pod 属于这个 Deployment 的标签选择器
- template labels: app: my-webapp:为新创建的 Pod 添加了标签,用于匹配选择器
1
2
3
4
5
6
7
8
9
10
11
12
13
14
15
16
17
18
19
20
21
22
23
24
25
26
27
28
29
30
31
32
33
34
35
36
37
38
39
40
41
42
43
44
45
46
47
48
49
50
51
52
53
54
55
56
57
58
59
60
61
62
63
64
65
66
67
68
69
70
71
72
73
74
75
76apiVersion: apps/v1
kind: Deployment
metadata:
name: webapp-deployment
spec:
replicas: 3
selector:
matchLabels:
app: my-webapp
template:
metadata:
labels:
app: my-webapp
spec:
containers:
- name: webapp
image: nginx:v1.27.0
ports:
- containerPort: 80
envFrom:
- configMapRef:
name: webapp-config
- name: database
image: mysql:v9.0.1
env:
- name: MYSQL_ROOT_PASSWORD
valueFrom:
secretKeyRef:
name: db-credentials
key: password
volumeMounts:
- name: db-data
mountPath: /var/lib/mysql
volumes:
- name: db-data
persistentVolumeClaim:
claimName: database-pvc
apiVersion: v1
kind: Service
metadata:
name: webapp-service
spec:
selector:
app: my-webapp
ports:
- protocol: TCP
port: 80
nodePort: 30001
type: NodePort
apiVersion: v1
kind: ConfigMap
metadata:
name: webapp-config
data:
WEBAPP_ENV: "production"
apiVersion: v1
kind: Secret
metadata:
name: db-credentials
type: Opaque
data:
password: MTIz
apiVersion: v1
kind: PersistentVolumeClaim
metadata:
name: database-pvc
spec:
accessModes:
- ReadWriteOnce
resources:
requests:
storage: 10MiapiVersion: apps/v1 和 apiVersion: v1 区别
- apiVersion: apps/v1:
apps/v1是 Kubernetes 中用于管理应用程序工作负载的 API 版本。- 在
apps/v1版本中,包含了Deployment、DaemonSet、StatefulSet等控制器对象的定义。 - 通常用于创建部署、守护进程集、有状态集等应用程序控制器
- apiVersion: v1:
v1是 Kubernetes 中核心 API 对象的稳定版本。- 在
v1版本中,包含了核心对象如Pod、Service、Namespace、ConfigMap、Secret等的定义。 - 用于创建核心资源对象,如 Pod、Service、ConfigMap 等
- apiVersion: apps/v1:
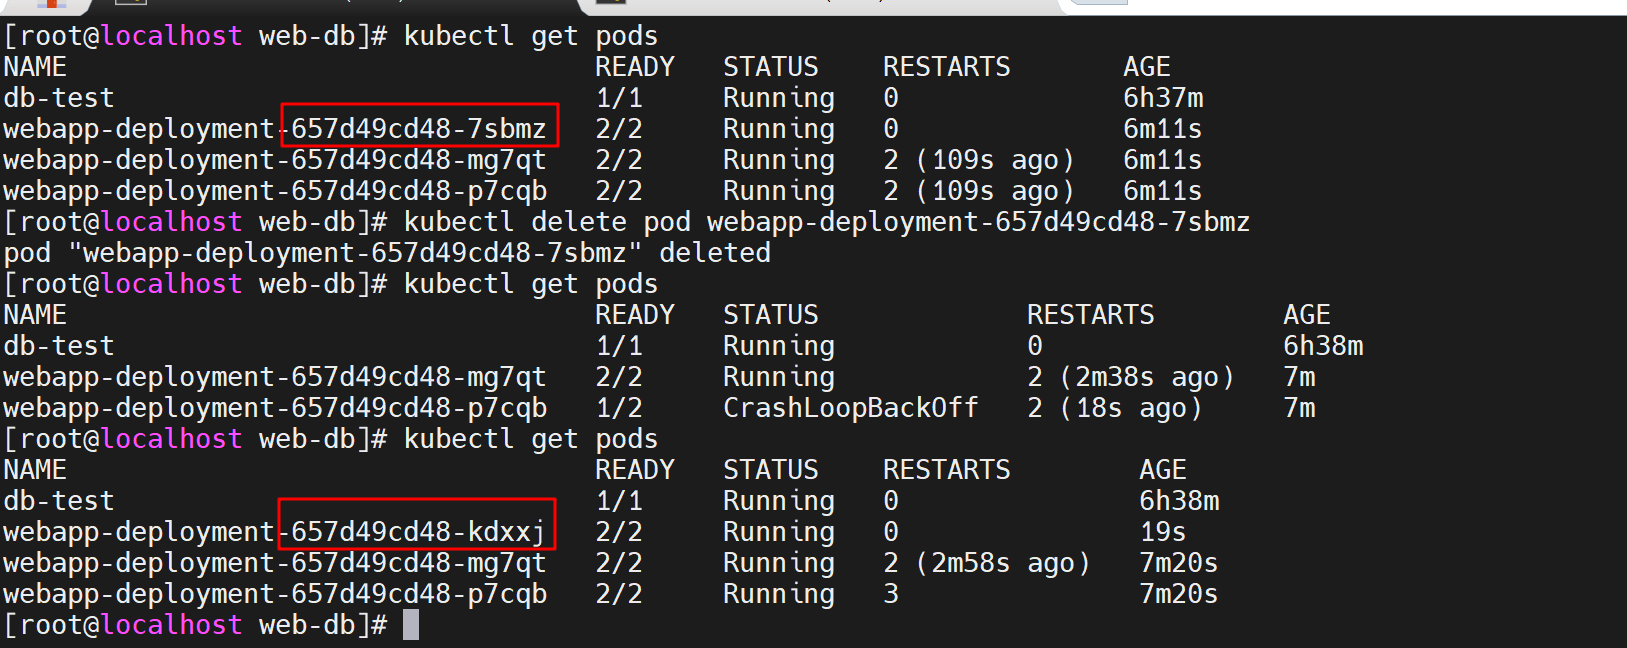
此时删除 pod,deployment 会自动再次生成 pod
如果需要彻底删除
- 使用
kubectl get deployments拿到<deployment-name> - 彻底删除
kubectl delete deployment <deployment-name>,将触发 Kubernetes 控制器删除该 Deployment 中的所有 Pod,删除有时间间隔,可以通过kubectl get events查看
- 使用
版本8——StatefulSet
既然无状态应用有 deployment,那么像 DB 这样的有状态应用,也有对应的处理方式
k8s 提供了
StatefulSet的概念,用于有状态应用的生命周期管理On the other hand, a Kubernetes
StatefulSetis used for stateful applications where each pod has a unique identity and persistent storage. StatefulSets provide stable network identities and are suitable for databases, key-value stores, and other applications that require unique persistent storage and ordered scaling.配置如下
1
2
3
4
5
6
7
8
9
10
11
12
13
14
15
16
17
18
19
20
21
22
23
24
25
26
27
28
29
30
31
32
33
34
35
36
37
38
39
40
41
42
43
44
45
46
47
48
49
50
51
52
53
54
55
56
57
58
59
60
61
62
63
64
65
66
67
68
69
70
71
72
73
74
75
76
77
78
79
80
81
82
83
84
85
86
87
88
89
90
91
92
93
94
95
96
97
98
99
100
101apiVersion: apps/v1
kind: Deployment
metadata:
name: webapp-deployment
spec:
replicas: 3
selector:
matchLabels:
app: my-webapp
template:
metadata:
labels:
app: my-webapp
spec:
containers:
- name: webapp
image: nginx:v1.27.0
ports:
- containerPort: 80
envFrom:
- configMapRef:
name: webapp-config
apiVersion: apps/v1
kind: StatefulSet
metadata:
name: database-statefulset
spec:
serviceName: database
replicas: 1
selector:
matchLabels:
app: database
template:
metadata:
labels:
app: database
spec:
containers:
- name: database
image: mysql:v9.0.1
env:
- name: MYSQL_ROOT_PASSWORD
valueFrom:
secretKeyRef:
name: db-credentials
key: password
volumeMounts:
- name: db-data
mountPath: /var/lib/mysql
volumes:
- name: db-data
persistentVolumeClaim:
claimName: database-pvc
volumeClaimTemplates:
- metadata:
name: database-data
spec:
accessModes: [ "ReadWriteOnce" ]
resources:
requests:
storage: 10Mi
apiVersion: v1
kind: Service
metadata:
name: webapp-service
spec:
selector:
app: my-webapp
ports:
- protocol: TCP
port: 80
nodePort: 30001
type: NodePort
apiVersion: v1
kind: ConfigMap
metadata:
name: webapp-config
data:
WEBAPP_ENV: "production"
apiVersion: v1
kind: Secret
metadata:
name: db-credentials
type: Opaque
data:
password: MTIz
apiVersion: v1
kind: PersistentVolumeClaim
metadata:
name: database-pvc
spec:
accessModes:
- ReadWriteOnce
resources:
requests:
storage: 10Mi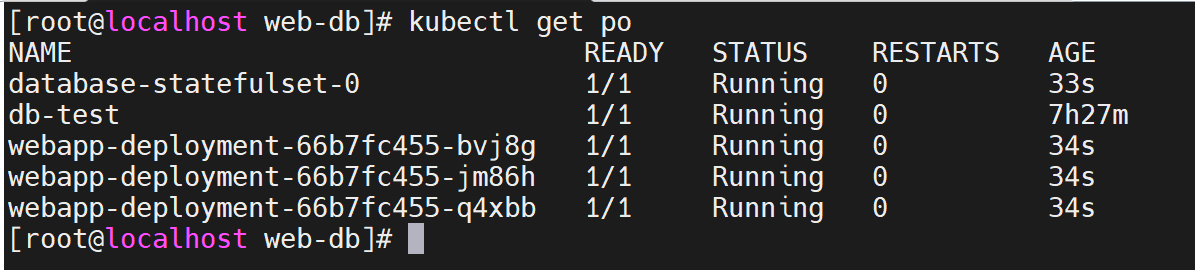
k8s error
pod 报错 ErrImagePull 或 ImagePullBackOff
通过
kubectl describe pods [pod name]可查看详细信息,从 Events 可看到报错信息1
Warning Failed 11m kubelet Failed to pull image "nginx:latest": failed to pull and unpack image "docker.io/library/nginx:latest": failed to copy: httpReadSeeker: failed open: failed to do request: Get "https://production.cloudflare.docker.com/registry-v2/docker/registry/v2/blobs/sha256/a7/a72860cb95fd59e9c696c66441c64f18e66915fa26b249911e83c3854477ed9a/data?verify=1722076145-hCjnrHPwpwV1nad%2F30IHJ5M0EIE%3D": dial tcp 173.231.12.107:443: connect: connection refused
可以看到 k8s 无法拉取镜像,是因为 kind 需要将 image 加载到 cluster 中(否则会去官网 pull 镜像),并且 kind 不建议使用 latest,因此使用指定 tag 加载进 cluster,可见 Unable to pull images
NOTE: The Kubernetes default pull policy is
IfNotPresentunless the image tag is:latestor omitted (and implicitly:latest) in which case the default policy isAlways.IfNotPresentcauses the Kubelet to skip pulling an image if it already exists. If you want those images loaded into node to work as expected, please:- don’t use a
:latesttag
and / or:
- specify
imagePullPolicy: IfNotPresentorimagePullPolicy: Neveron your container(s).
See Kubernetes imagePullPolicy for more information.
- don’t use a
将镜像加载到 cluster:
kind load docker-image nginx:v1.27.0 mongo:v7.0.12 --name example1查看指定 node 已有的 image:
docker exec -it my-node-name crictl imagesWhere
my-node-nameis the name of the Docker container (e.g.kind-control-plane).
k8s 常用操作
- 查看特定 node 上的 pod:
kubectl get pods --field-selector spec.nodeName=<node-name>
附 centos 安装错误
kind create cluster 运行报错:
docker: Error response from daemon: failed to create task for container: failed to create shim task: OCI runtime create failed: runc create failed: cgroup namespaces aren't enabled in the kernel: unknown.
尝试解决,无果,相关问题 kind: v0.20.0 cannot create clusters on RHEL 7
1
2
3
4
5
6
7
8
9
10
11
12
13
14
15
16
17
18
19
20
21
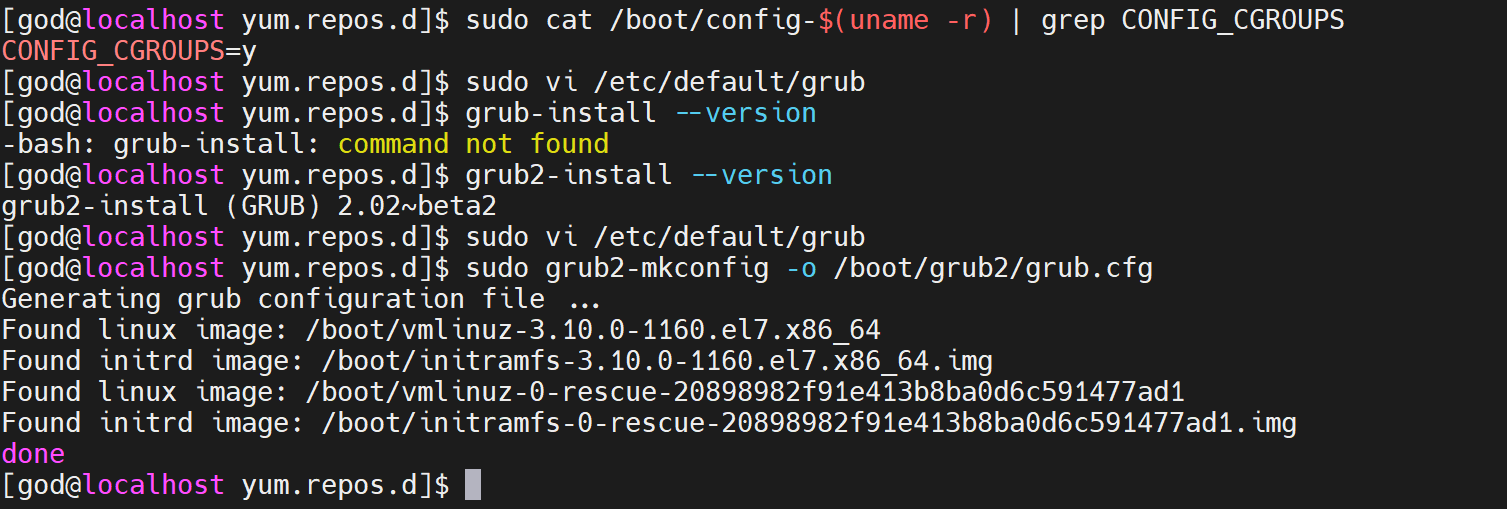
221. 检查内核配置, 如果输出中显示CONFIG_CGROUPS=n,则表示cgroup未启用
sudo cat /boot/config-$(uname -r) | grep CONFIG_CGROUPS
2. 修改参数
sudo vi /etc/default/grub
如果存在 在最后附加
GRUB_CMDLINE_LINUX="cgroup_enable=memory swapaccount=1"
3. 生效
查看引导方式
grub-install --version
grub2-install --version
对于GRUB引导
sudo update-grub
对于GRUB2引导
sudo grub2-mkconfig -o /boot/grub2/grub.cfg
对于Systemd-boot引导
sudo bootctl update
4. 重启系统
sudo reboot