Nginx使用说明
安装
分发版本安装
1
2
sudo apt update
sudo apt-get install nginxdocker安装编译安装
基础知识
基础命令
启动
Nginx:nginx查看版本:
nginx -v
等所有进程停止后退出
Nginx:nginx -s quit暴力退出
Nginx:nginx -s stop重新加载配置文件(热更新):
nginx -s reload测试配置文件:
nginx -t
目录结构
- 以
Ubuntu 20.04使用apt安装nginx.1.18.0(Ubuntu)为例,不同版本可能不完全一致,但相似
1 | . |
内置变量
$args:这个变量等于请求行中的参数,同$query_string$content_length:请求头中的 Content-length 字段$content_type:请求头中的 Content-Type 字段$document_root:当前请求在 root 指令中指定的值$host:请求行的主机名,为空则为请求头字段 Host 中的主机名,再为空则与请求匹配的 server_name$http_host:$host加端口$http_user_agent:客户端 agent 信息$http_cookie:客户端 cookie 信息$limit_rate:这个变量可以限制连接速率$request_method:客户端请求的动作,通常为 GET 或 POST$remote_addr:客户端的 IP 地址$remote_port:客户端的端口$remote_user:已经经过 Auth Basic Module 验证的用户名。$request_filename:当前请求的文件路径,由 root 或 alias 指令与 URI 请求生成$scheme:HTTP 方法(如 http,https)$server_protocol:请求使用的协议,通常是 HTTP/1.0 或 HTTP/1.1$server_addr:服务器地址,在完成一次系统调用后可以确定这个值$server_name:服务器名称$server_port:请求到达服务器的端口号$request_uri:包含请求参数的原始 URI,不包含主机名,如:”/foo/bar.php?arg=baz”$uri:不带请求参数的当前 URI,$uri 不包含主机名,如”/foo/bar.html”$document_uri:与 $uri 相同
配置文件介绍
概述
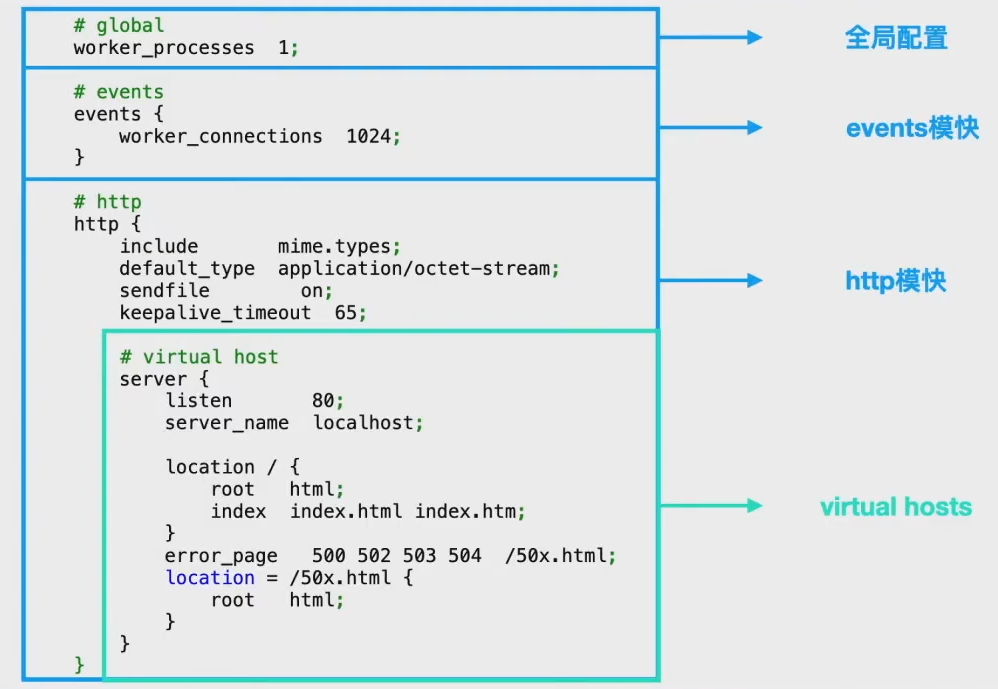
分为四个部分
- 全局配置:影响
Nginx服务器全局 ,一般配置worker数量,错误日志等 events配置:负责Nginx与客户端的网络连接,如配置网络IO模型,配置单个worker支持的最大连接数等http模块:主要配置部分,配置请求转发,反向代理等的地方virtual hosts模块:通过虚拟主机将不同的配置进行隔离
- 全局配置:影响
配置文件详解
1 | ######## global ######## |
location
优先级顺序:精确匹配,前缀匹配,正则匹配,普通字符匹配
精确匹配(=):等于,严格匹配,如果找到,立即停止搜索并立即处理此请求前缀匹配(^~):如果匹配成功,则不再匹配其它 location,^表示 “非”,即不查询正则表达式正则匹配(~和~*):前者表示区分大小写,后者表示不区分大小写示例
1
2
3
4
5
6
7location ^~ /images/ {
proxy_pass http://localhost:8080;
}
location ~ \.jpg {
proxy_pass http://localhost:8080;
}/images/1.jpg代理到http://localhost:8080/images/1.jpg/some/path/1.jpg代理到http://localhost:8080/some/path/1.jpg
Upstream
负载均衡模块
1
2
3
4
5
6
7
8
9
10
11
12
13
14
15
16http {
# 将多个服务器放在cluster1集群中
upstream cluster1 {
server 192.168.1.163:8080;
server 192.168.1.164:8080;
server 192.168.1.165:8080;
}
server {
# 匹配到时,讲请求转发到cluster1集群中
# 具体分配根据负载均衡策略进行分配
location /app1/ {
proxy_pass http:ss//cluster1/;
}
}
}负载均衡策略
1
2
3
4
5
6
7
8
9
10
11
12
13
14
15
16
17
18
19
20
21
22
23
24
25
26
27
28
29
30
31
32
33
34
35
36
37
38
39
40
41
42
43
44
45
46
47
48
49
50
51
52
53
54
55
56
57
58
59
60
61
62
63# 轮询,默认方式,按照时间顺序一个个分配
# 如果有服务器下线,Nginx会自动提出下线服务器
upstream cluster1 {
server 192.168.1.163:8080;
server 192.168.1.164:8080;
server 192.168.1.165:8080;
}
# weight
# 权重越高,分配的请求越多
upstream cluster1 {
server 192.168.1.163:8080 weight = 1;
server 192.168.1.164:8080 weight = 1;
server 192.168.1.165:8080 weight = 10;
}
# ip_hash
# 根据客户端的IP来固定选择分配的服务器
upstream cluster1 {
ip_hash;
server 192.168.1.163:8080;
server 192.168.1.164:8080;
server 192.168.1.165:8080;
}
# hash
# 通用hash,允许用户自定义hash的key,key可以是字符串、变量或组合
# 例如,key可以是配对的源 IP 地址和端口,也可以是 URI
# consistent参数启用 ketama一致哈希算法
upstream backend {
hash $request_uri consistent;
server 192.168.1.163:8080;
server 192.168.1.164:8080;
server 192.168.1.165:8080;
}
# 最小连接
# 将下一个请求分配给活动连接数最少的服务器(较为空闲的服务器)
upstream backend {
least_conn;
server 192.168.1.163:8080;
server 192.168.1.164:8080;
server 192.168.1.165:8080;
}
# 随机
# 每个请求都将传递到随机选择的服务器
# two是可选参数,NGINX 在考虑服务器权重的情况下随机选择两台服务器,然后使用指定的方法选择其中一台,默认为选择连接数最少(least_conn)的服务器
upstream backend {
random two least_conn;
server 192.168.1.163:8080;
server 192.168.1.164:8080;
server 192.168.1.165:8080;
}
# 健康检查
# 在反向代理中,如果后端服务器在某个周期内响应失败次数超过规定值,nginx会将此服务器标记为失败,并在之后的一个周期不再将请求发送给这台服务器
# 通过fail_timeout来设置检查周期,默认为10秒
# 通过max_fails来设置检查失败次数,默认为1次
upstream backend {
server 192.168.1.163:8080;
server 192.168.1.164:8080; max_fails=3 fail_timeout=30s;
}
try_files
try_files:可用于检查指定的文件或目录是否存在,如果不存在,则重定向到指定位置
如下,如果原始URI对应的文件不存在,NGINX将内部重定向到
/www/data/images/default.gif1
2
3
4
5
6
7
8
9
10
11
12
13
14
15
16
17
18
19
20
21
22server {
root /www/data;
location /images/ {
# 最后一个参数也可以是状态代码(状态码之前需要加上等号)
try_files $uri /images/default.gif;
}
location / {
try_files $uri $uri/ $uri.html =404;
}
# 如果原始 URI 和附加尾随斜杠的 URI 都没有解析到现有文件或目录中,则请求将重定向到命名位置,该位置会将其传递到代理服务器
location / {
try_files $uri $uri/ @backend;
}
location @backend {
proxy_pass http://backend.example.com;
}
}
return与rewrite
return
服务端停止处理并将状态码
status code返回给客户端return code URLreturn code textreturn codereturn URL
强制所有请求使用
HTTPS1
2
3
4
5
6
7
8
9
10
11
12
13
14
15
16
17
18
19# 错误写法
server {
listen 8003;
server_name a.hello.com
return 301 https://localhost:8004;
}
# 正确写法
server {
listen 8003;
server_name a.hello.com
return 301 https://192.168.56.105:8004;
}
# 原因在于return是重定向,而proxy_pass是转发,因此使用return时不能使用localhost
rewrite
如果指定的正则表达式与请求 URI 匹配,则 URI 将按照字符串中的指定进行更改。指令按其在配置文件中出现的先后顺序执行
1
2
3
4
5
6
7server {
# ...
rewrite ^(/download/.*)/media/(\w+)\.?.*$ $1/mp3/$2.mp3 last;
rewrite ^(/download/.*)/audio/(\w+)\.?.*$ $1/mp3/$2.ra last;
return 403;
# ...
}- 上面是使用该指令的示例 NGINX 重写规则。它匹配以字符串
/download开头的 URL,然后在路径后面的某个位置包含/media/或/audio/目录 - 它将这些元素替换为
/mp3/,并添加相应的文件扩展名,.mp3或.ra。和 变量捕获未更改的路径元素 - 例如
/download/cdn-west/media/file1变成了/download/cdn-west/mp3/file1.mp3- 如果文件名上有扩展名(如
.flv),则表达式会将其剥离,并将其替换为.mp3
- 上面是使用该指令的示例 NGINX 重写规则。它匹配以字符串
如果字符串包含新的请求参数,则以前的请求参数将追加到这些参数之后。如果不需要这样做,则在替换字符串的末尾放置一个问号可以避免附加它们
1
rewrite ^/users/(.*)$ /show?user=$1? last;
last与break
last:如果当前规则匹配,停止处理后续rewrite规则,使用重写后的路径,重新搜索location及其块内指令break:如果当前规则匹配,停止处理后续rewrite规则,执行{}块内其他指令
使用
概述及使用建议
conf.d和sites-available
- 直接在
conf.d里面配置xx.conf比在sites-available中配置,再添加超链接到sites-enabled中方便
重复的配置可继承自父级
1 | # 推荐 |
不要将所有请求都代理到后端服务器(动静分离)
- 考虑到很多请求是访问静态内容(如图片,css,javascript等文件),可以使用缓存或者配置静态目录来减少发送到后端的请求数量,这样可以减小后端服务器的开销
1 | # 推荐 |
检查文件是否存在使用try_files代替if -f
1 | # 推荐 |
在重写路径中包含http://或https://
1 | # 推荐 |
通过域名访问(反向代理)
HTTP代理
直接在浏览器输入域名即可访问同一服务器部署的不同网站,不需要显示输入端口
1
2
3
4
5
6
7
8
9
10
11
12
13
14
15
16
17
18
19
20
21
22
23
24
25
26
27
28
29
30server {
listen 80 default_server; # 监听端口
root /mnt/aa; # 访问根目录
index index.html index.htm; # 默认页,可以不设置
server_name www.hello.com; # 根据域名跳转
location / {
try_files $uri $uri/ =404;
proxy_pass http://127.0.0.1:8081; # 跳转的路径
}
}
server {
listen 80; # 监听端口
root /mnt/bb;
index index.html index.htm;
server_name bs.hello.com;
location / {
try_files $uri $uri/ =404;
proxy_pass http://127.0.0.1:8082; # 另一个路径
}
}
# 如果proxy-pass的地址包括/或其他路径,那么/some/path将会被替换
# 如下所示,访问 http://localhost/some/path/page.html 将被代理到 http://localhost:8080/zh-cn/page.html
server {
listen 80; # 监听端口
server_name 1.hello.com;
location /some/path/ {
proxy_pass http://localhost:8080/zh-cn/;
}
}由于使用反向代理之后,后端服务无法获取用户的真实IP,所以,一般反向代理都会设置以下header信息
1
2
3
4
5
6
7
8
9location /some/path/ {
#nginx的主机地址
proxy_set_header Host $http_host;
#用户端真实的IP,即客户端IP
proxy_set_header X-Real-IP $remote_addr;
proxy_set_header X-Forwarded-For $proxy_add_x_forwarded_for;
proxy_pass http://localhost:8088;
}常用变量的值
$host:nginx主机IP,例如192.168.56.105$http_host:nginx主机IP和端口,192.168.56.105:8001$proxy_host:localhost:8088,proxy_pass里配置的主机名和端口$remote_addr:用户的真实IP,即客户端IP。
非HTTP代理
fastcgi_pass:将请求转发到FastCGI服务器(多用于PHP)
scgi_pass:将请求转发到SCGI server服务器(多用于PHP)
uwsgi_pass:将请求转发到uwsgi服务器(多用于python)
memcached_pass:将请求转发到memcached服务器
TCP反向代理:与
HTTP反向代理同级,需要修改nginx.conf文件1
2
3
4
5
6
7
8
9
10
11
12
13
14# HTTP代理
http {
server {
listen 8002;
proxy_pass http://localhost:8080/;
}
}
# TCP代理
stream {
server {
listen 13306;
proxy_pass localhost:3306;
}
SSL设置(HTTPS)
1 | server { |
允许与禁止IP
1 | allow 12.12.12.22 # 允许访问 |
域名迁移,不让用户收藏的链接或者搜索引擎的链接失效
将请求从
www.old-name.com和old-name.com永久重定向到www.new-name.com,包含http和https请求1
2
3
4
5
6server {
listen 80;
listen 443 ssl;
server_name www.old-name.com old-name.com;
return 301 $scheme://www.new-name.com;
}
答疑
fastcgi_params和fastcgi.conf的区别
两者的差异
1
2fastcgi.conf只比fastcgi_params多了一行
fastcgi_param SCRIPT_FILENAME $document_root$fastcgi_script_name;原本只有
fastcgi_params文件,fastcgi.conf是nginx 0.8.30才引入的,主要为是解决部分人在定义SCRIPT_FILENAME时采用硬编码的方式,如fastcgi_param SCRIPT_FILENAME /var/www/foo$fastcgi_script_name,于是为了规范用法便引入了fastcgi.conf为什么要引入新文件,而不是在旧的文件上改造?
- 这是因为
fastcgi_param指令是数组型的- 和普通指令相同的是:内层替换外层;
- 和普通指令不同的是:当在同级多次使用的时候,是新增而不是替换
- 换句话说,如果在同级定义两次
SCRIPT_FILENAME,那么它们都会被发送到后端,这可能会导致一些潜在的问题,为了避免此类情况,便引入了一个新的配置文件
- 这是因为
推荐使用:
fastcgi.conf
转发和重定向
转发是服务端行为,重定向是客户端行为
转发:反向代理
proxy_pass属于转发,浏览器的访问栏输入的地址不会发生变化
重定向:
return,rewrite属于重定向,在客户端进行。浏览器的访问栏输入的地址会发生变化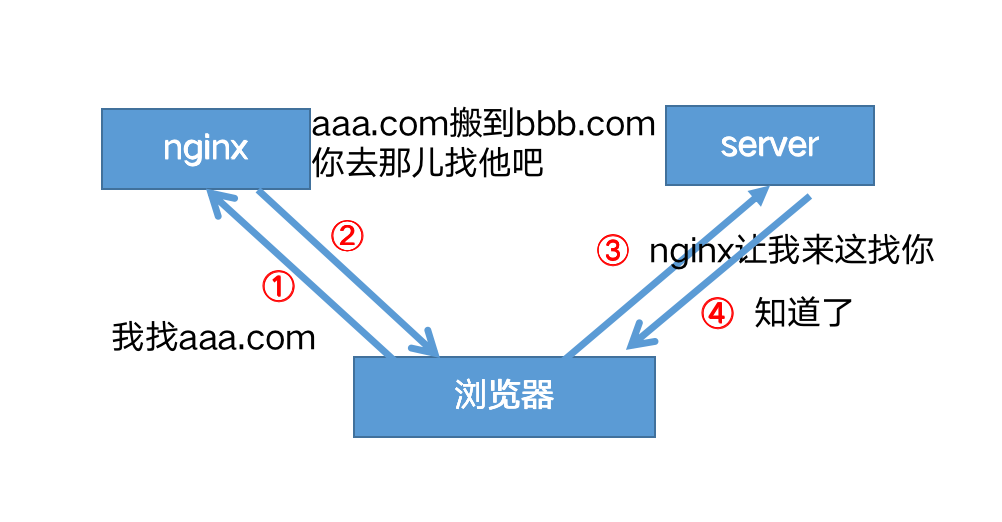
注意事项
- 正确的配置未生效,请清除浏览器缓存
- 当你确定修改的配置的正确的,但是未生效,请清除浏览器缓存或者禁用浏览器缓存
- 在
HTTPS中不启用SSLv3- 由于 SSLv3 中存在
POODLE漏洞,建议不要在启用了 SSL 的站点中使用 SSLv3 - 规则:
ssl_protocols TLSv1 TLSv1.1 TLSv1.2;
- 由于 SSLv3 中存在
- 不要将 root 目录配置成
/或/root - 谨慎使用
chmod 777- 可以使用
namei -om /path/to/check显示路径上的所有权限,并找到问题的根本原因
- 可以使用
附录
默认文件
nginx.conf
1 | user www-data; |
default
sites-available/default
1 | ## |
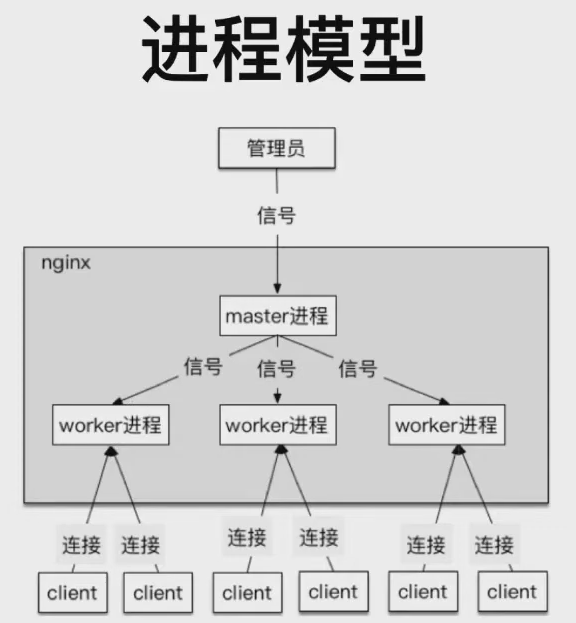
进程模型
本地测试环境与backup
使用
podman搭建本地 Nginx 测试环境,docker同理,镜像可见docker:nginxpodman启动报错及解决: Podman mount host volume return ‘Error: statfs: no such file or directory’ in Mac OSNginx版本
1
2root@xxx:/# nginx -v
nginx version: nginx/1.25.3Nginx.conf
1
2
3
4
5
6
7
8
9
10
11
12
13
14
15
16
17
18
19
20
21
22
23
24
25
26启动 并指定自定义 nginx.conf
:ro 表示 read only
podman run --name nginx-test -v ./nginx.conf:/etc/nginx/nginx.conf:ro -p 7890:80 nginx
nginx.conf
用于测试 backup 调度策略
events {
use epoll;
worker_connections 1024;
}
http {
upstream backend {
server x.x.x.x:1234;
server x.x.x.x:1235 backup;
server x.x.x.x:1236 backup;
server x.x.x.x:1237 backup;
}
server {
location / {
proxy_pass http://backend;
}
}
}
使用
Python搭建本机简易 webserver1
2
3
4
5
6
7
8
9
10
11
12
13
14
15
16
17
18
19import argparse
from flask import Flask
app = Flask(__name__)
def hello_world():
return f'Hello, World! Running on port {app.config["PORT"]}'
if __name__ == '__main__':
parser = argparse.ArgumentParser(description="A simple Flask application.")
parser.add_argument('-p', '--port', type=int, help="The port number to listen on.", default=1234)
args = parser.parse_args()
app.config["PORT"] = args.port
# 如果不指定 host='0.0.0.0',那么只能通过 127.0.0.1:port 才能访问
# 使用 ifconfig 查到的 ip:port 方式无法访问
# 报错: curl: (7) Failed to connect to ip port xxx after 7 ms: Couldn't connect to server
app.run(host='0.0.0.0', port=args.port)关于
host配置,flask 源码介绍如下:param host: the hostname to listen on. Set this to
'0.0.0.0'tohave the server available externally as well. Defaults to
'127.0.0.1'or the host in theSERVER_NAMEconfig variableif present.
Nginx backup,可通过
curl http://localhost:7890进行测试,7890即启动容器时映射的端口,首先都会尝试访问主主可用时,不会访问 backup
主不可用时,轮询访问 backup,每次一个,如果上一个 backup 不可用,才会到下一个 backup,官方介绍
By default, requests are distributed between the servers using a weighted round-robin balancing method. In the above example, each 7 requests will be distributed as follows: 5 requests go to
backend1.example.comand one request to each of the second and third servers. If an error occurs during communication with a server, the request will be passed to the next server, and so on until all of the functioning servers will be tried. If a successful response could not be obtained from any of the servers, the client will receive the result of the communication with the last server.假设一主三备
- 前五次访问,主可用,一直访问主
- 第六次访问时,主不可用,访问备 A
- 第七次访问时,主可用,访问备 B
- 第八次访问时,主可用,访问主
- 第九次访问时,主不可用,访问备 C,如果备 C 不可用,则会依次轮训备 A 和备 B